My new bike: Build (video) Cinelli with SRAM Force AXS
Get to know my new bike. Follow me through the process of frame and component selection, and onward to the workshop for the build. You can watch the evolution of the Cinelli Pressure ADR that I now call my own. – Video series by Rob Arnold In the first video of […]
Get to know my new bike. Follow me through the process of frame and component selection, and onward to the workshop for the build. You can watch the evolution of the Cinelli Pressure ADR that I now call my own.
– Video series by Rob Arnold
In the first video of the Cinelli bikes series (above) I explain the component selection and provide weights for the frameset, groupset, and sundry items. It’s an introduction to the bike that I’ll ride on a regular basis after over five years of riding a Focus Izalco Max (with first-generation SRAM Force AXS eTap groupset).
See the chapter summary (complete with time-code links, below) for a summary of what is in Episode 1 of this #StoryOfMyBike series.
My ‘old bike’ – the Focus which has seen many component changes throughout the course of my time riding it – will be handed down to my eldest son who has started riding again at age 19. It won’t be long before he outgrows the medium sized Izalco Max, so the time is right for him to try a bike with disc brakes. It will be a notable change for him as, during his return to riding, he has been riding another hand-me-down – a rim brake equipped Focus Cayo that I was riding before the Izalco Max.

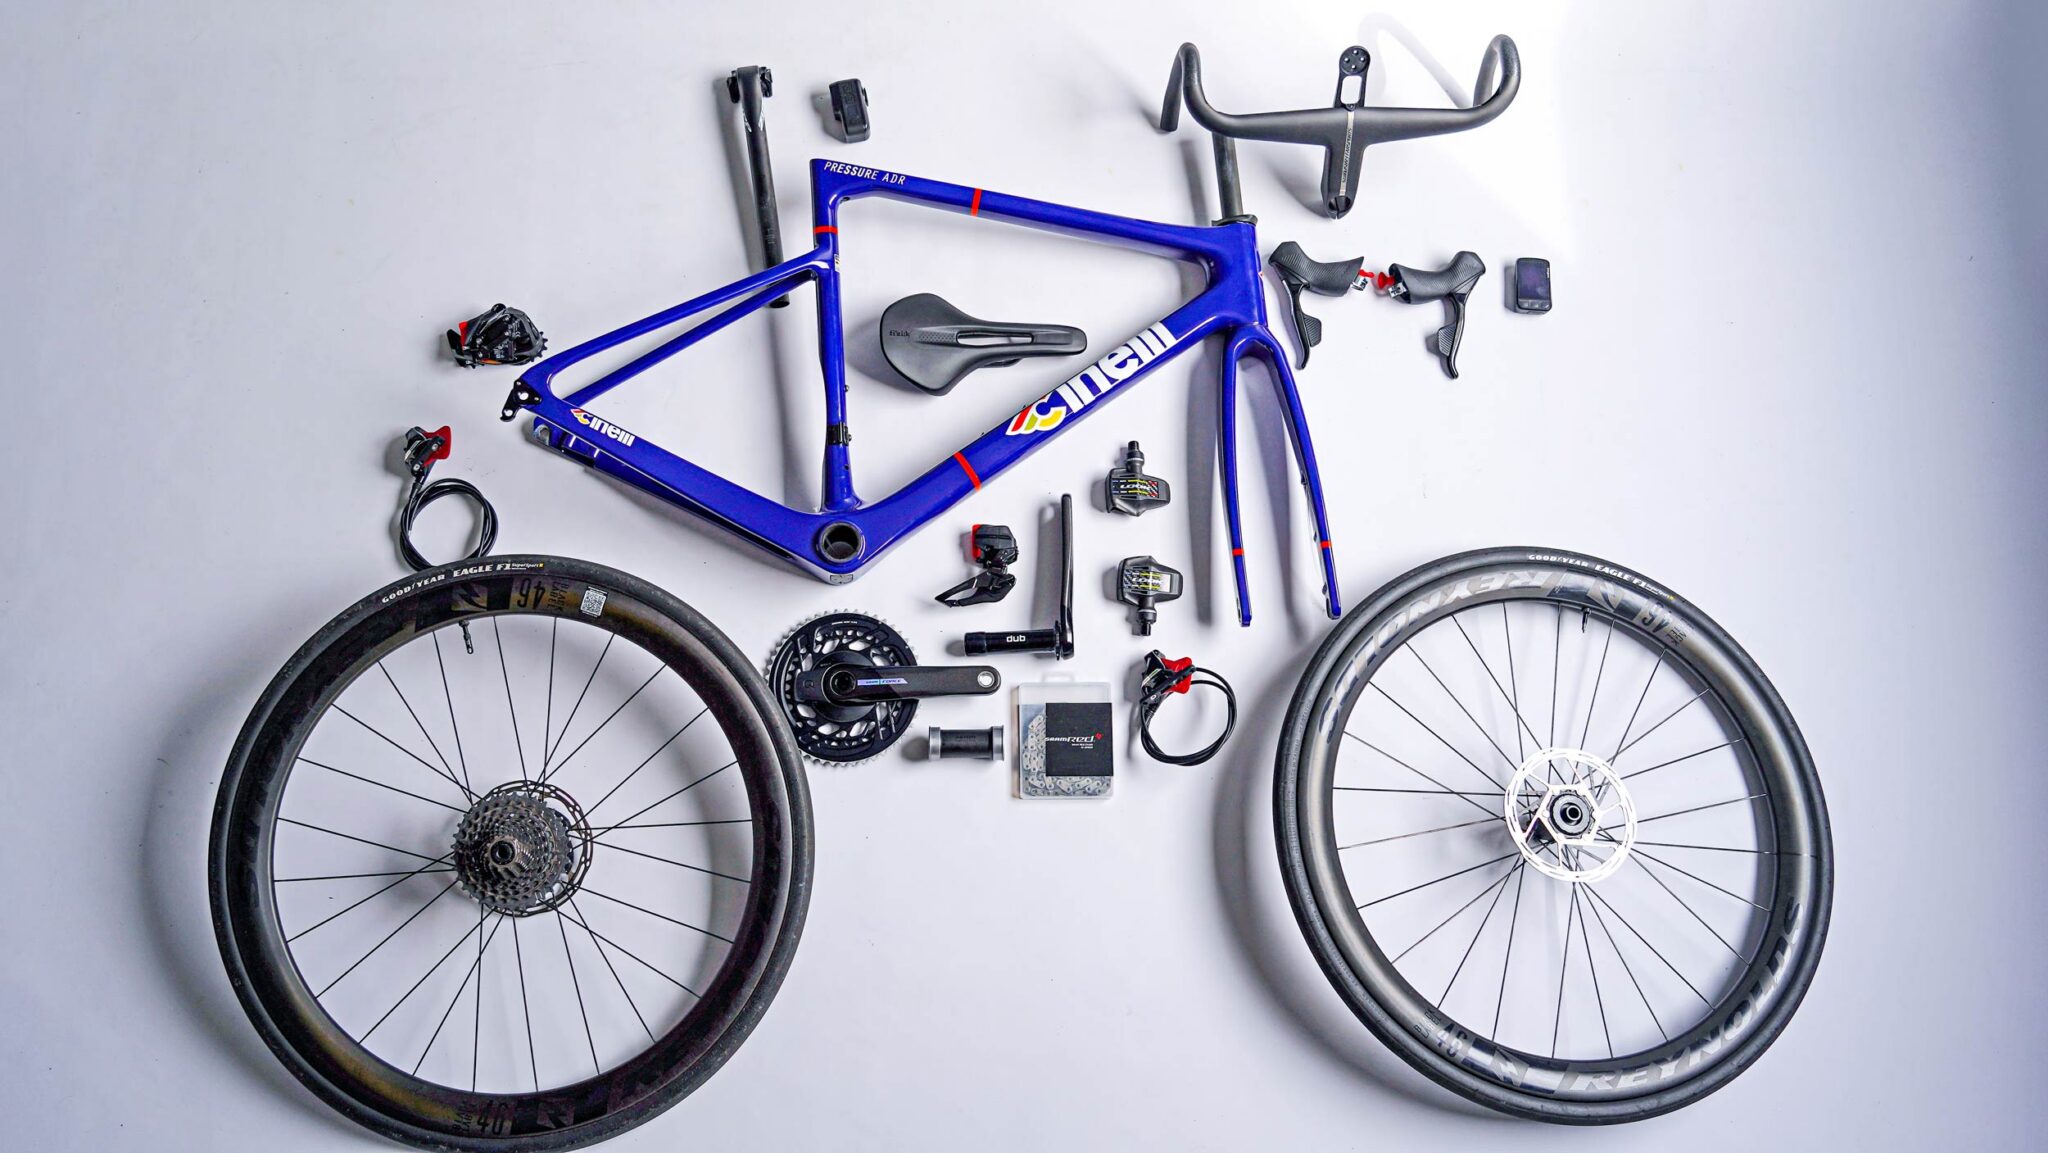
The new bike features the Cinelli Pressure ADR frame, one step down from the top-of-the-line ‘Pressure’ – which has a similar aesthetic, but with a proprietary aero seat post and a little more refinement of the frame.
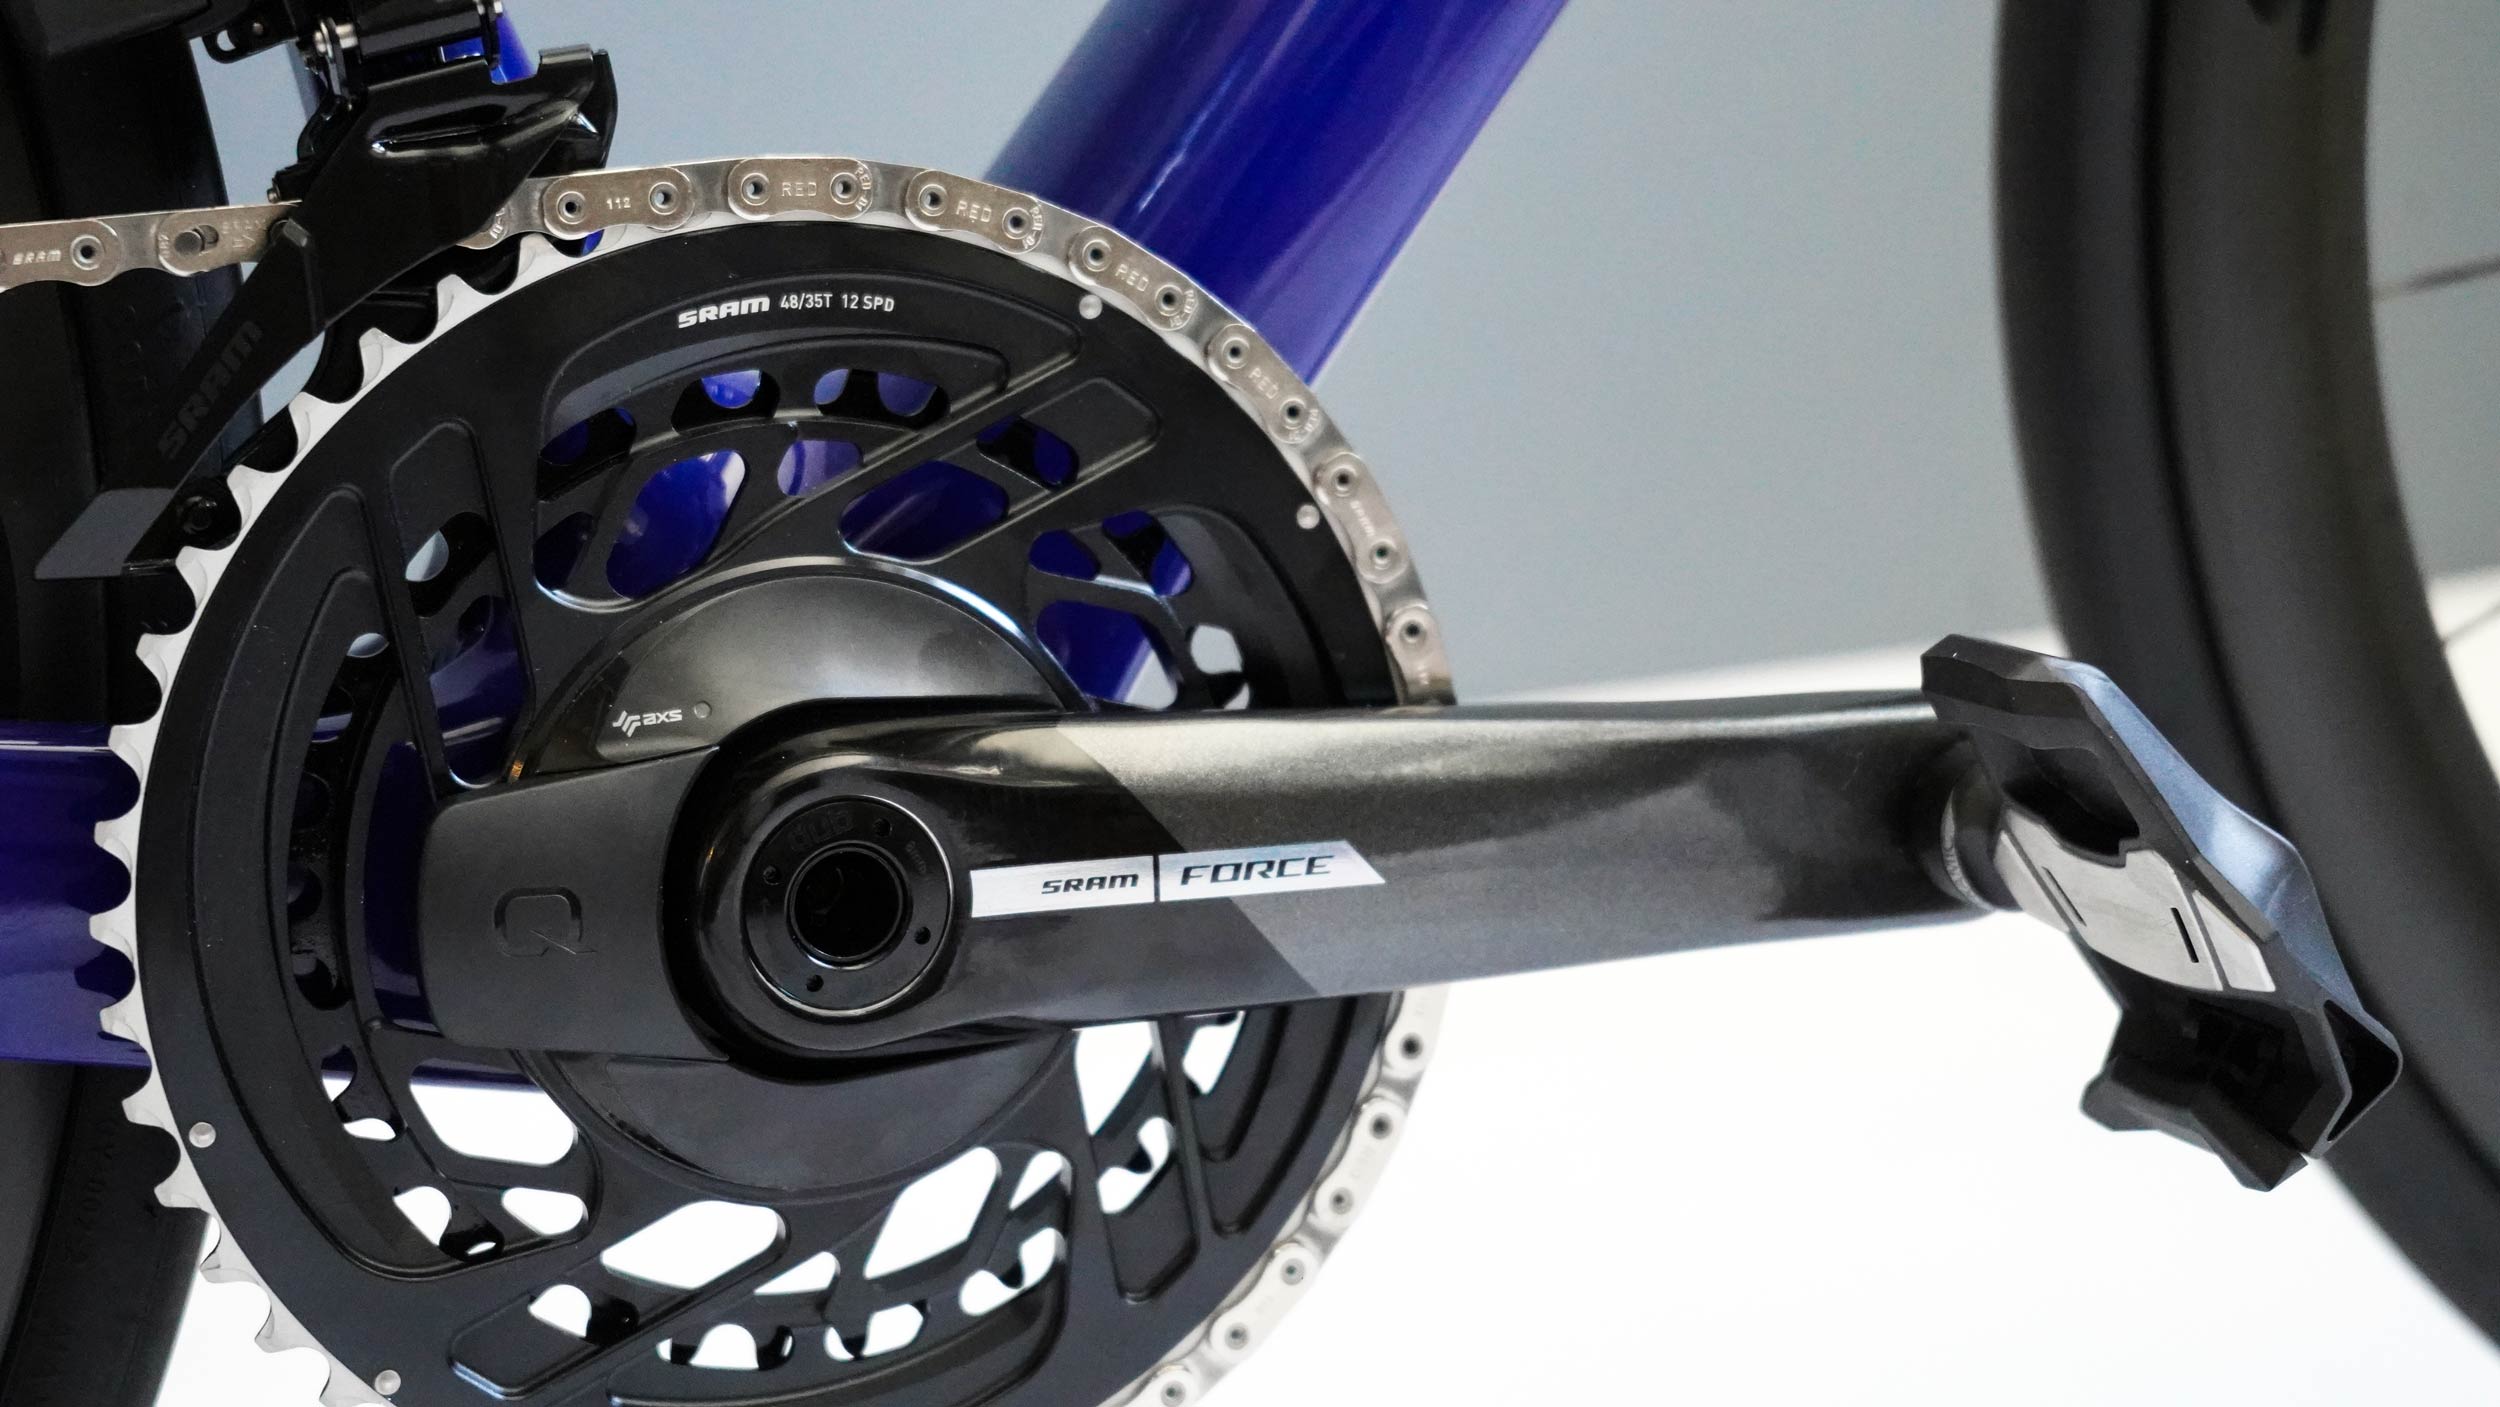
The groupset is the latest release of the Force AXS ensemble (ie. no longer with eTap in the title) which was released in March 2023.
The 172.5mm cranks include the Quarq power meter like the one that was on my previous bike; it is surprisingly easy to pair to the small and relatively basic Wahoo Elemnt Bolt, the cycle computer that I’ve been using for years.
My gear selection was made when ordering the groupset and includes a 10-33 12-speed SRAM cassette. (I have a Force version but that has been swapped out for the same ratio in SRAM Red, which is lighter, quieter and – in my appraisal – provides a smoother gear shift.) At the front is a compact configuration:
I’ve carried over a set of wheels from Reynolds that I have been riding with for the past few months. The ‘Black Label 46’ rims are matched to Ringle hubs and have a recommended retail price of AUD$3,199 (as of August 2024). Not only are they good value and reliable wheels from a company with a long history in the road cycling market, they also come complete with a choice of freehubs – both micro-spline (for Shimano cassettes) and XDr (for SRAM 12-speed cassettes).

Pre-Build chapters // Timing links
| 0:00 | Intro to a new bike project |
| 0:33 | My 2019 Focus Izalco Max – soon to be my son’s bike |
| 1:11 | My New Bike – the Cinelli Pressure ADR frameset (distributed in Australia by Ciao Velo) |
| 3:07 | Weigh-in for components from the SRAM Force AXS groupset |
| 4:05 | Farsport F1S handlebar-and-stem combo (unboxing) |
| 8:36 | Look Kéo – my new favourite pedals |
| 9:45 | fi:zi’k saddle / preview of the One-To-One 3D custom printed program |
| 11:30 | Summary of the components and sundry parts weigh-in |

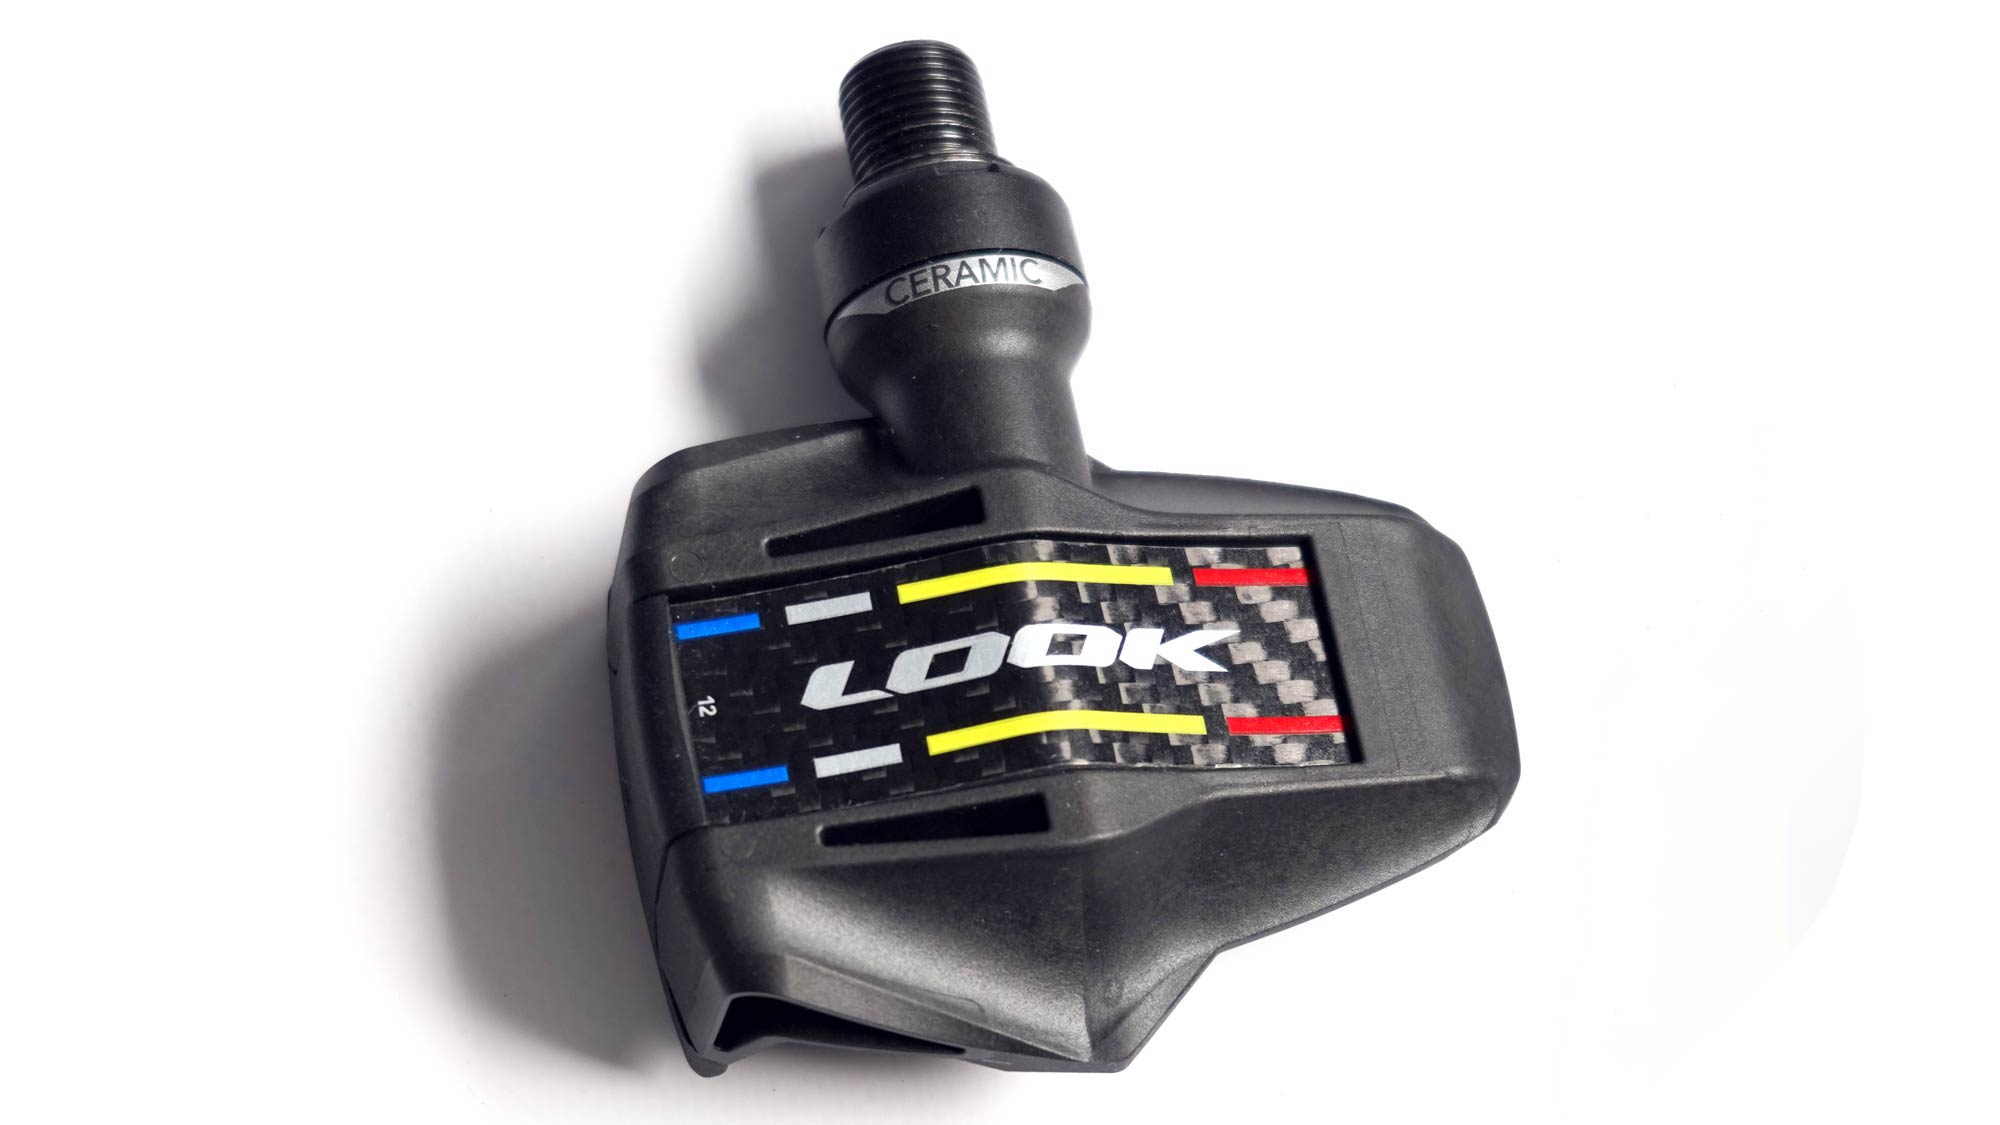
Pedals are Look Kéo Ceramic (233g for the pair) which is my “new favourite” after several years of using various systems including Shimano, Speedplay / Wahoo, and a selection of various Time designs.
The Kéo system suits me well and simply seems to provide a better pedalling platform. They are light, and the engagement is firm, reliable, and there are four different tension settings to choose from (8/12/16/20nm, and my choice is 12nm). Clipping in and out is similar to the Shimano system but I find it easier to clip in as the pedal is designed so that the front entry is weighted so that it welcomes the cleat.
Clipping out of the Kéo pedals requires a little extra effort when compared to the Shimano system but I like the firm hold and the lack of ‘float’ suits me fine.
The handlebar and stem selection provided an interesting challenge as I’ve become so used to the Coefficient RR handlebars that have been on my bike for years and I was keen to keep them on the next bike… but I also wanted to try an integrated handlebar and stem.
The proprietary stem that comes with the Focus Izalco Max from 2019 is a chunky beast that I became used to and while I’m yet to pull it off that bike for weighing purposes, it looks heavy and I’m confident to say that this is where I was able to shave considerable weight when going from one bike to the next.
After considering my budget and the choice of bar/stem options on the market, it came down to price, availability and sizing… with Farsports’ F1S ultimately getting the nod. Beautifully presented they were shipped from the Australian agent, Cycle Motion in Western Australia, and only took a day to deliver.
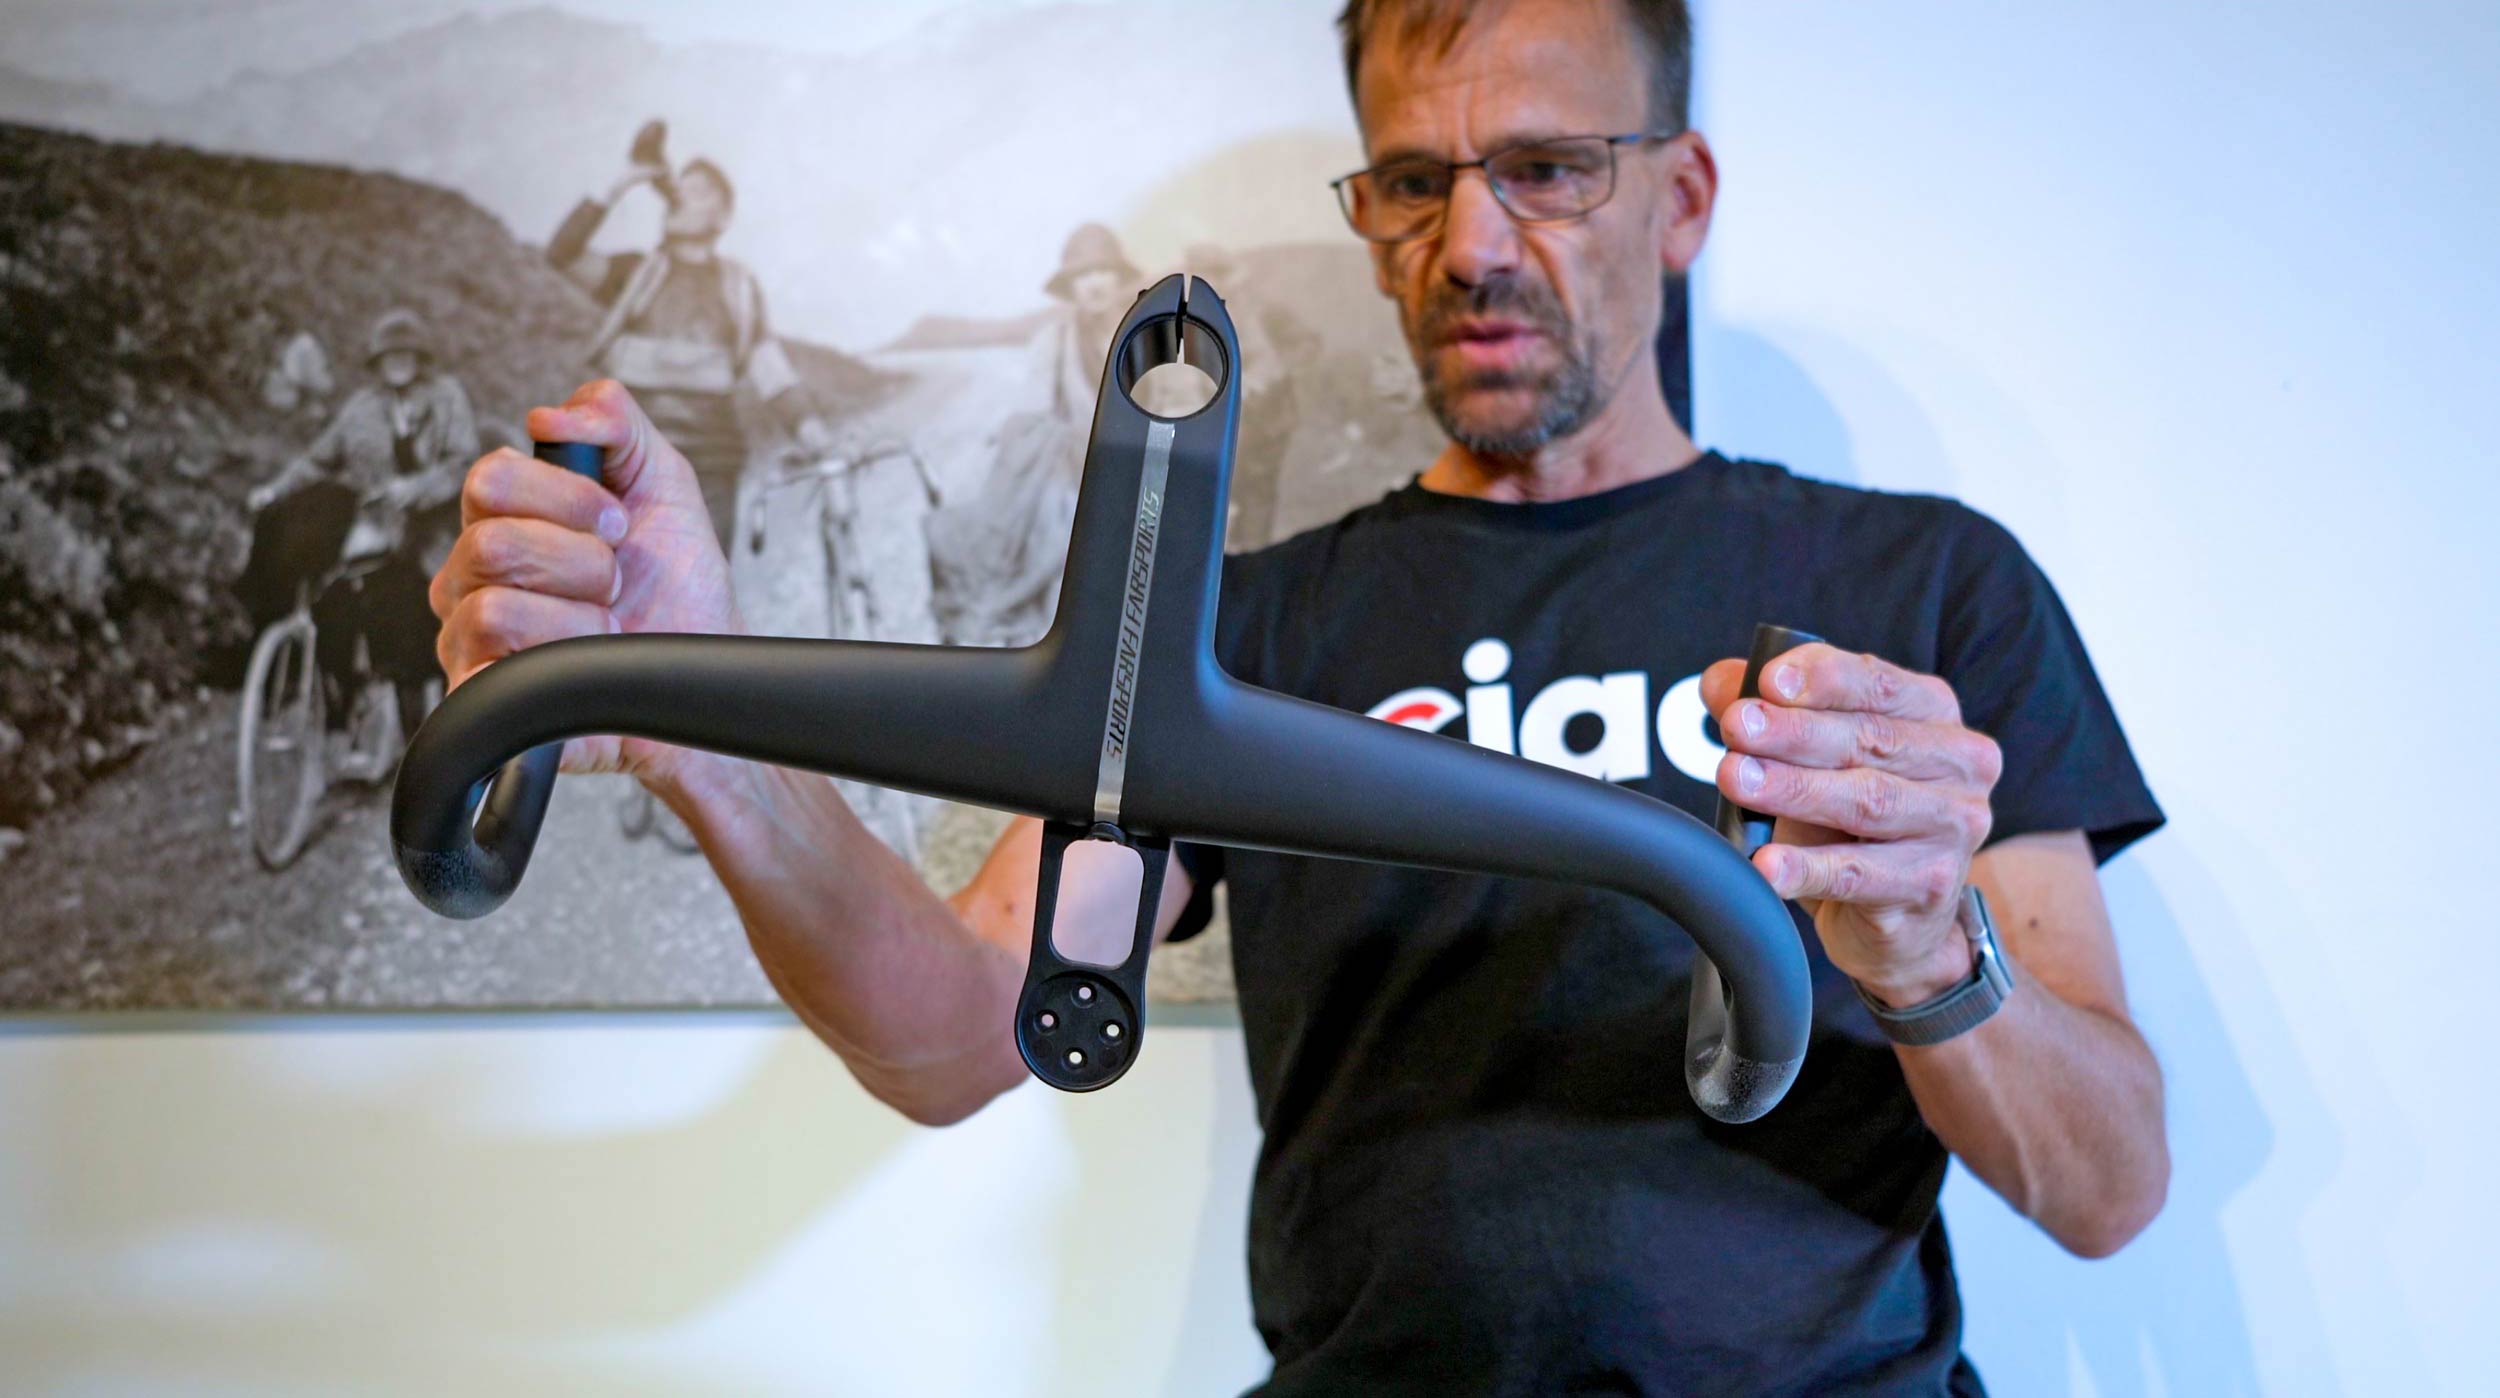
At almost half the cost of similar designs by Black Inc, ENVE and Deda, the F1S are the second-tier option from Farsports and, now that I’ve had a few rides on the bike, I can say that they suit the build perfectly!
There’s a very slight flare at the base of handlebars which measure 400m (centre-to-centre) where the point where brake levers are attached and they taper from round to an oval shape down in the lower bend. I find this very comfortable and suitable for me now that I’m riding in the drops a lot of the time.
The Farsports handlebars come with a computer mount already fitted (as well as the usual range of fittings for Garmin or Wahoo cycle computers), as well as an extra bracket to for a camera or lighting arrangement.
I’ll add comments about the ride qualities as my time on the bike progresses but the handlebar/stem combo is one of the stiffest I’ve ever used.

Into the workshop at Tune Cycles
Once all the parts were assembled, filmed and weighed, it was time to go to the workshop and get a mechanic to build the bike. Tune Cycles is a mobile mechanic service based in Sydney and it also as a shopfront / workshop in Marrickville. It happens to be nearby my office, which is a bonus, and they do fantastic work in a timely manner.
Tune Cycles is where I go when I need mechanical work done and in the video for part two of the Cinelli series you can watch as Bruce Mumford puts the Cinelli frame in the work stand before methodically and professionally assembling the bike. Click the link below to see the bike come together.
Workshop Chapters // Timing links
| 0:00 | Intro |
| 0:36 | Into the workshop at Tune Cycles, Marrickville |
| 1:36 | Cutting the fork steerer |
| 2:25 | Fitting the hydraulic hoses |
| 3:06 | Installation of headset and fork |
| 5:12 | Silencing the hoses (with foam inserts) |
| 7:26 | Bottom bracket and crankset |
| 10:50 | Complete bike weigh-in… |
Expect to see a lot more of this bike in the coming weeks and months. It’s still early days but it has only taken a few rides to become familiar with the characteristics of my first new bike in quite a while. Of course, there will continue to be the steady flow of review bikes drifting in and out of the office – as has been the case for over 25 years – but the Cinelli is mine for the next little while.
This is the bike that will be used when new products are sent in for review. And the spec of the Cinelli is likely to change over time as parts come (and go) and the cycling market continues to strive to make good bikes even better.
If you have any comments or questions, please don’t hesitate to join the conversation that has already started on YouTube and the other RIDE Media social media portals.
– By Rob Arnold